Sonifex Software
SCi Software Control Interface
![]()
- Used to remotely configure and control devices via RS-232 or TCP/IP.
- Multiple devices can be connected simultaneously.
- Includes drivers to control DHY-03, DHY-03EC, RB-ADDA2, RB-SC2, RB-DS2, RB-PD2, RB-DD4, RB-DSD1, RB-DSD8, RB-VHDDD8, RB-VHEDD8, RB-DEDD8, RB-DEED8, RB-DMX4, RB-TGHDB, RB-TGHDX, S0, S1, RM-4C8, RM-2S4 and RM-2S10.
SCi Related Links:
Latest Software Versions and Downloads >
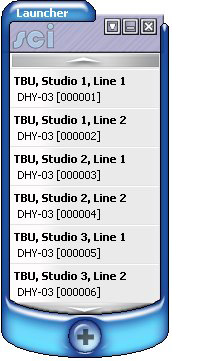 Launcher
- The Launcher is used to display a list of available devices.
- Each device can be selected, and a device window displayed.
- Access the Device List window to define new, edit or delete device connection details.
Defining Devices
- Devices are defined through the Device List, as described below
Device Control
Instructions:
- Use the UP and DOWN buttons to scroll the displayed devices, if needed.
- Select the required device to open.
- Use the selected device's window to remotely control the device (e.g. DHY-03 below).
Fig 1. SCi Launcher
Device List
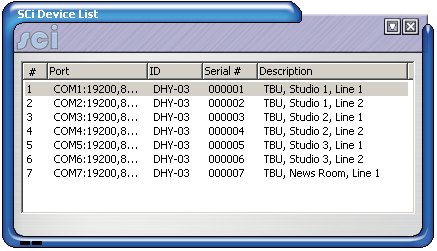
Fig 2. SCi Device List
- The Device List window is used to define the list of available devices.
- Devices can be added, edited and removed from the list.
Instructions
- Press the '+' button on the Launcher window.
- Use the 'Discover Devices' function or manually define devices using 'Edit->New Device'.
- Give meaningful descriptions to each device by selecting 'Edit->Edit Device' from the menu.
- Select 'File->Save' from the menu.
- Close the Device List window to re-display the Launcher.
DHY-03 Digital Telephone Hybrid
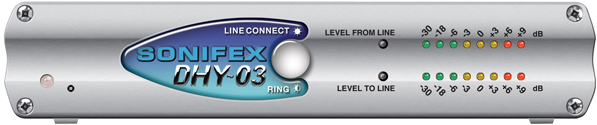
- SCi's DHY-03 driver can be used to configure DHY-03 units.
- It can also be used to dial outgoing calls using DTMF.
- Connection via DHY-03 unit's RS-232 port.
Related Links:
> DHY-03 Digital Telephone Hybrid
> Country Code List INI File
DHY-03 Device Information

Fig 3. DHY-03 Device Information
- The Device Information display shows product type, serial number, basecode and firware versions.
- Displays RS-232 connection details.
- This information is shown during initialisation of connection to DHY-03 unit.
- Also displays progress of firmware upload.
- Indicates unit's current status.
Instructions:
- Select 'View->Device Information' from the menu.
DHY-03 Dial Pad and Phone Book

Fig 4. DHY-03 Dial Pad and Phone Book
The dial pad and display appear on the right of the screen:
- Used to dial outgoing calls.
- Used to answer incoming calls.
- Used to drop connected calls.
- The clock displays current time/date.
- A timer displays duration of incoming/outgoing connected calls.
The phone book appears on the left of the screen:
- Create, edit and delete phone book entries.
- Use the phone book entries to quickly dial outgoing calls.
DHY-03 Manual Dial
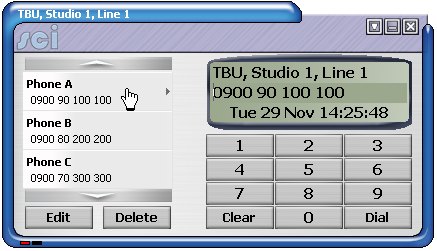
Fig 5. Selecting a Phone Book Entry
Instructions:
- Use dial pad buttons 0-9 to enter required number.
- Use DIAL button to begin dialling, or CLEAR button to cancel.
DHY-03 Dial Phone Book
Instructions:
- Select the required phone book entry to dial
- The selected number appears in the dial display.
- Use DIAL button to begin dialling, or CLEAR button to cancel.
- The phone book entry remains selected for 10 seconds.
DHY-03 Adding a Phone Book Entry
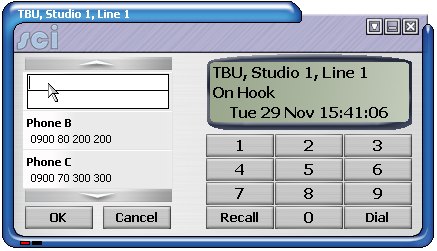
Fig 6. Adding a Phone Book Entry
Instructions:
- Press the NEW button to begin editing.
- Input a descriptive name in the top box.
- Input the dial number in the lower box.
- Use the OK button to save the entry, or CANCEL.
DHY-03 Edit Phone Book Entry
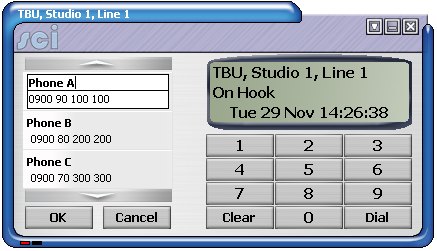
Fig 7. Editing a Phone Book Entry
Instructions:
- Select the phone book entry to edit.
- Press the EDIT button to begin editing.
- Edit the name and/or number details.
- Use the OK button to save the changes, or CANCEL.
DHY-03 Delete Phone Book Entry
Instructions:
- Select the phone book entry to delete.
- Press the DELETE button.
- Confirm deletion.
DHY-03 Redialling Last Number
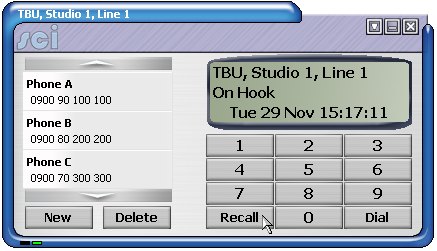
Fig 8. Redialling Last Number
Instructions:
- Press the RECALL button to recall the last number.
- The last dialled number is displayed.
- Press the DIAL button to begin dialling.
DHY-03 Settings Mode
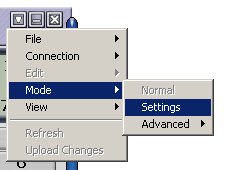
Fig 9. Select Settings Mode
- The settings mode used to alter DHY-03 settings.
- Also used to upload new firmware to the unit.
- The settings mode cannot be used while a call is connected.
Instructions:
- Select 'Mode->Settings' from the menu.
- Wait for Standard Settings screen to be displayed.
Please note that the function and meaning of these settings is described in the DHY-03 handbook.
DHY-03 Standard Settings
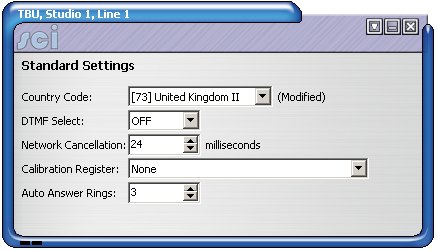
Fig 10. DHY-03 Standard Settings
- The correct country code selection is essential for proper operation in the DHY-03 unit.
- Country Code List INI File
Instructions:
- While in Settings Mode, select 'Edit->Standard Settings' from the menu.
- Alter the settings as required.
- Select 'Upload Changes' from the menu.
DHY-03 Jumper Function
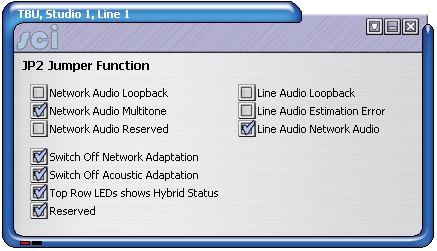
Fig 11. DHY-03 JP2 Jumper Function
- The function of the internal JP2 jumper can be configured for different uses.
Instructions:
- While in Settings Mode, select 'Edit->Jumper Function' from the menu.
- Alter the settings as required.
- Select 'Upload Changes' from the menu.
DHY-03 TI Settings
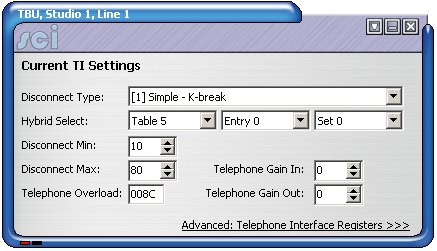
Fig 12. DHY-03 Telephone Interface Settings
- The telephone interface settings include input/output gain and line disconnect types.
Instructions:
- While in Settings Mode, select 'Edit->Current TI Settings->Show TI Settings' from the menu.
- Alter the settings as required.
- Select 'Upload Changes' from the menu.
DHY-03 TI Registers
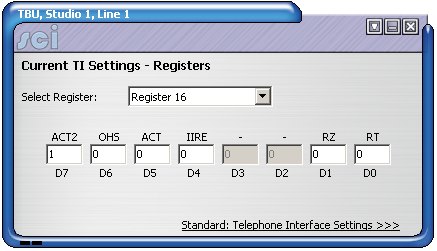
Fig 13. DHY-03 TI Registers
- Advanced users can directly manipulate the hybrid's telephone interface registers.
- Settings can be found in the DHY-03 handbook.
Instructions:
- While in Settings Mode, select 'Edit->Current TI Settings->Show TI Settings' from the menu.
- Click on 'Advanced: Telephone Interface Registers'
- Alter the settings as required.
- Select 'Upload Changes' from the menu.
DHY-03 Disconnect Tone Settings
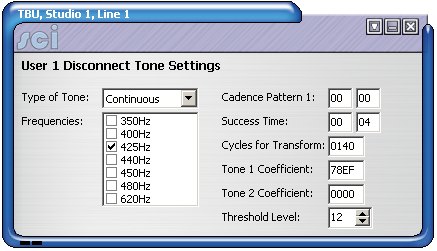
Fig 14. DHY-03 Disconnect Tones
- Six sets of user-defined disconnect tone settings can be saved.
Instructions:
- While in Settings Mode, select 'Edit->User DT Settings' from the menu.
- Continue to select the required set name.
- Alter the DT settings as required.
- Select 'Upload Changes' from the menu.
DHY-03 User Names
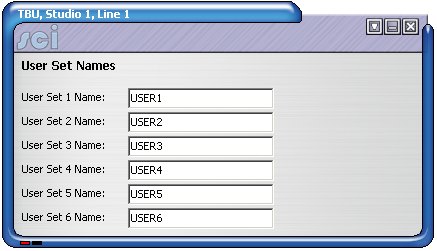
Fig 15. DHY-03 User-Set Names
- Six sets of user-defined Disconnect Tone settings can be saved.
- Each of these six sets can be given a unique name.
Instructions:
- While in Settings Mode, select 'Edit->User Set Names' from the menu.
- Alter the names as required.
- Select 'Upload Changes' from the menu.
DHY-03 Upload Firmware
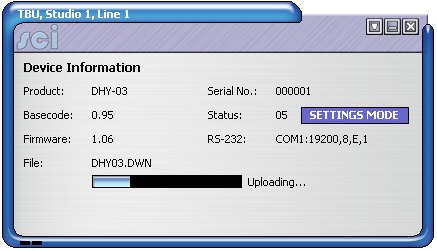
Fig 16. DHY-03 Uploading Firmware
- New firmware can be uploaded to the DHY-03 unit as-and-when this becomes available.
Instructions:
- While in Settings Mode, select 'Mode->Settings->Advanced->Upload Firmware' from the menu.
- Select firmware .DWN file.
- Wait for the upload to complete, and for the unit to reset before continuing use.
![]()